.png)
Create a Booking
If you have permission to create bookings for your account, you will see the “Create booking” button at the top of your bookings dashboard.

When you click this button, the portal will take you through a step-by-step process to make your booking. The process is split into 3 pages:
The Freight Details page has 3 sections. As you complete each section, the next section will appear below it.
Customer Details
In the Customer Details section you’ll select the 4 parties that need to know about the booking:
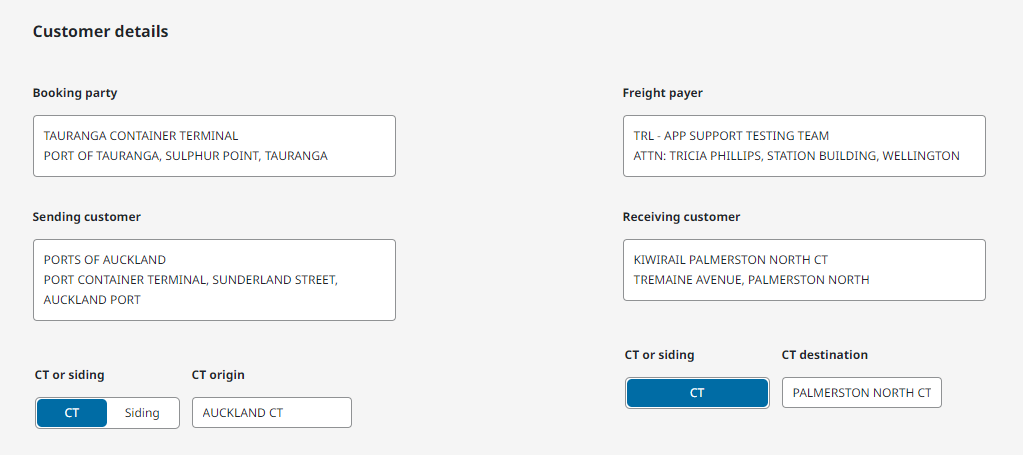
The Booking Party: Who’s making the booking.
The Freight Payer: Who’s paying for the booking. If you have access to a secondary Freight Payer you can choose them here.
The Sending Customer: Who’s sending the freight. Choose a previous sender from the list, or search for one:
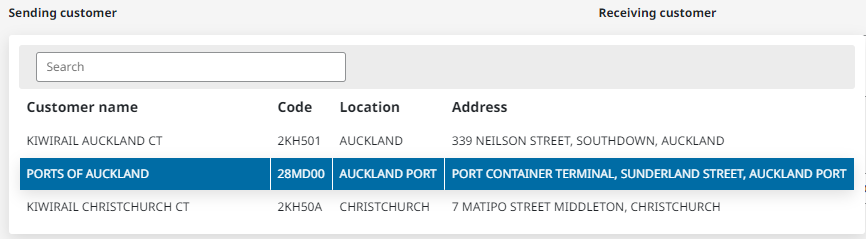
The Receiving Customer: Who the freight’s going to. The list works the same as the sender.
Did you know: There are two types of rail locations: CT (Container Terminal) or Siding (Private Siding).
A CT Site is one of KiwiRail’s 17 CT sites across the country where we load and discharge containerised freight. You can deliver and pick up your freight at our CT sites, or we can arrange a truck on your behalf.
A Siding is a privately owned and operated third-party site. The siding owner loads and unloads freight from our wagons and lets us know when the train is ready to go. Some examples of sidings are Auckland Port, Centreport, Mainfreight Christchurch, and Toll Auckland.
If your site isn’t listed in the Sending Customer or Receiving Customer lists, you can type in the address and we’ll get it to the nearest CT site.
Shipping Details
In the Shipping Details section you’ll tell us the details we need know about the booking:
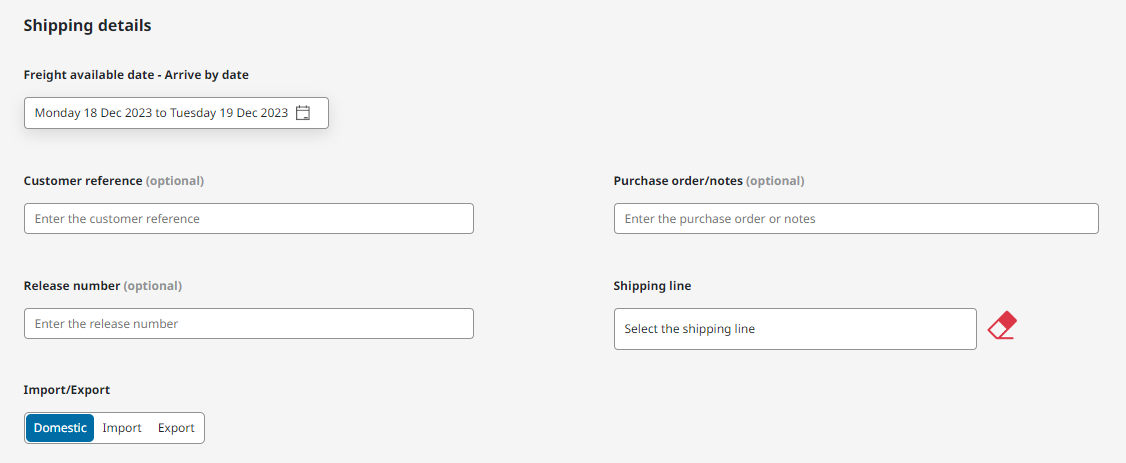
Freight Available Date - Arrive By Date: Let us know when your freight will be available at the origin, and when you need it at the destination. We’ll only show you services that meet these dates.
Customer Reference, Purchase Order/Notes, and Release Number are all optional fields you can enter to keep track on your booking. These references will show up on your invoice.
Import/Export: Select if the booking is for an import container or an export container. More information is required for these bookings, read the linked guides to learn more.
Equipment Details
In the Equipment Details section you’ll tell us about the equipment you want us to move:
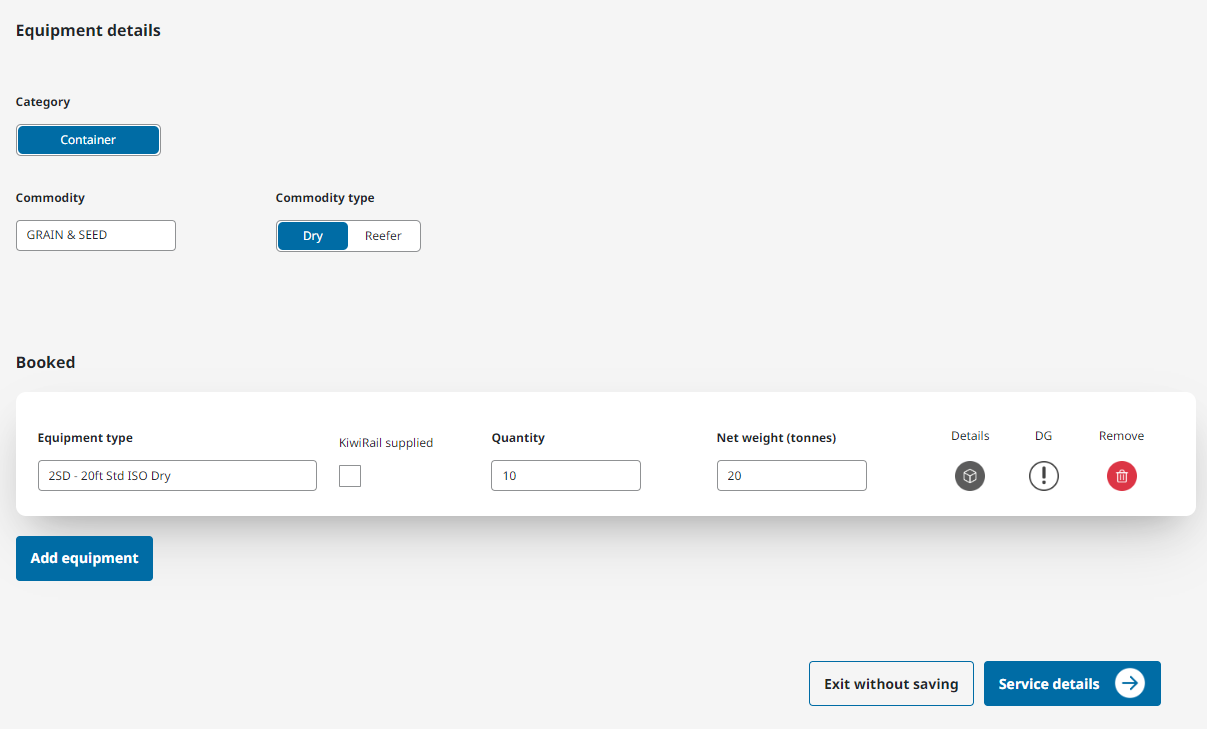
There’s a lot of options here, so we’ll go through them top to bottom:
Category: Either Container or Wagon. The wagon option will only show if you’re moving from siding to siding.
Commodity: Choose the freight commodity you’re moving. If you want a new commodity added to this list send us a message and we’ll get it added.
Commodity Type: Either Dry or Reefer. Reefer bookings require more information.
Equipment Type: Choose the type of Containers or Wagons you want to move. If you’re wanting a new equipment type (e.g. 10ft containers, GXTs/GSMs) added to your account just let us know.
KiwiRail Supplied: Tick this box if you want to hire our equipment.
Quantity: How many of the equipment you want to move.
Net Weight: The net weight of the freight in the equipment.
Details: These are optional details you can add about the equipment like the equipment ID, different net weights per equipment, and any order specific order numbers you want to add.
DG: Click the DG button to add Dangerous Goods information to your booking.
Reefer: If you chose the Reefer Commodity Type you will need to give us the reefer details as well. We need to know the set temp of your container, and whether you need a generator or not.
If you want to add more equipment types to your booking (For example you want to move 20' containers and 40' containers in the same booking) you can click the Add Equipment button.
Once you’re happy with the equipment details, click Service Details to go to the next page.
The Service Details page will allow you to book a Rail Service, and request Road Services if you need them.
Service Details
At the top of the page you’ll see the Sending Customer and Receiving Customer you selected on page 1, as well as the Freight Available Date - Arrive By Date you selected. These are the dates that we’ll search our system for to find rail services. You can change the dates by clicking the calendar icon.

Next you’ll see the journey of your equipment. The 4 locations in the journey are numbered in red below:
The Sending Customer.
The Rail Origin associated with the Sending Customer.
The Rail Destination associated with the Receiving Customer.
The Receiving Customer.
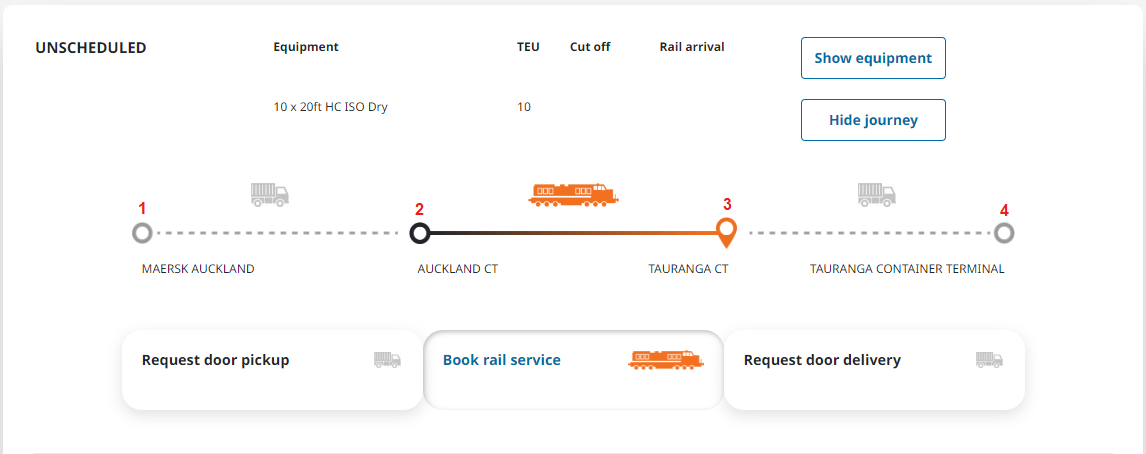
The Rail Origin/Destination is the CT or Siding we’re transporting your freight to. If the Rail Origin/Destination is a CT site you will need to arrange a truck to uplift your container, or request a road service from us.
Book a Rail Service:
When you click Book Rail Service, the portal will show you services where the Service Cutoff and Estimated Arrival are inside the Freight Available Date - Arrive By Dates:
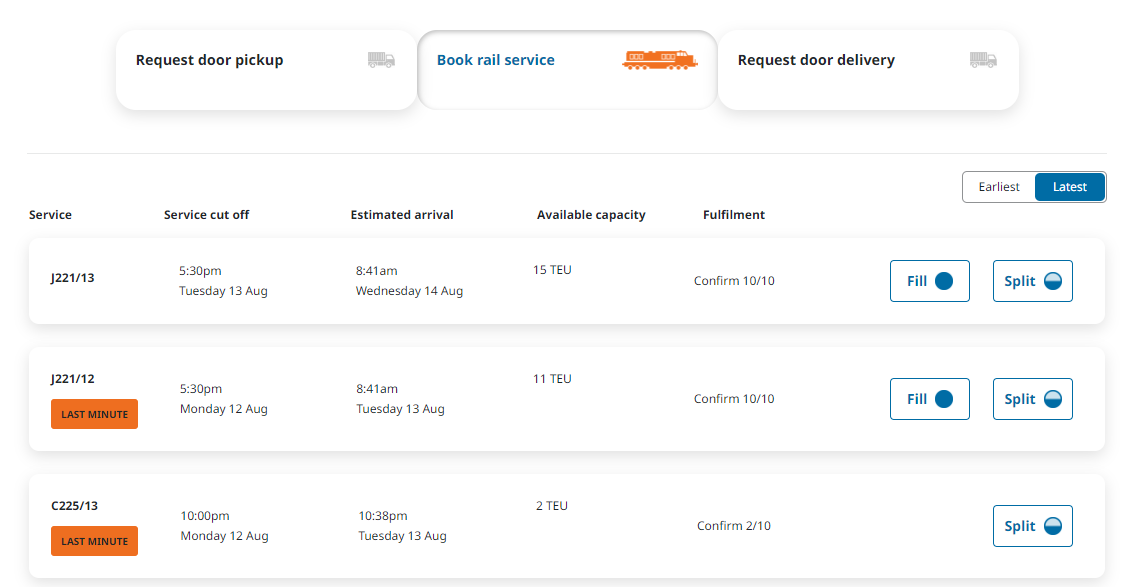
Each service will show you:
Service: The service ID(s) that make up the journey. Multiple ID’s will be separated with a comma.
Warnings: If the service has a warning (for example LAST MINUTE), it will be highlighted in orange.
Service cut off: When the freight needs to be ready to travel at the Rail Origin.
Estimated arrival: The scheduled arrival time at the Rail Destination.
Available capacity: The capacity left on that service in TEU (Twenty-foot Equivalent Units).
Reserved capacity: Any capacity reserved for your freight payer will show in a circle next to the available capacity.
Fulfillment: How much equipment can be allocated to the service. Displayed as “Confirm X/Y”.
To allocate equipment to a service, you can click on Fill or Split:
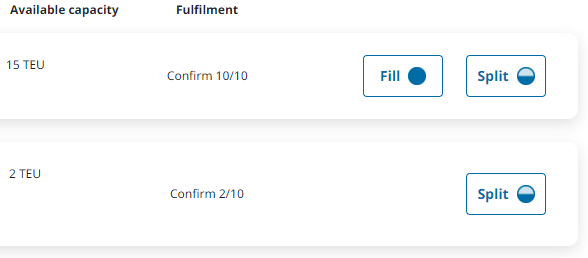
Fill will put all of your equipment onto that service. The Fill button will only show if the service has enough capacity for all of your equipment.
Split will allow you to split your equipment over multiple services. When you click Split you can choose how many equipment you want to assign to the service.
If you entered the Equipment IDs in the Equipment Details, you can select specific equipment to allocate to the service. Click the arrow to see the equipment IDs.
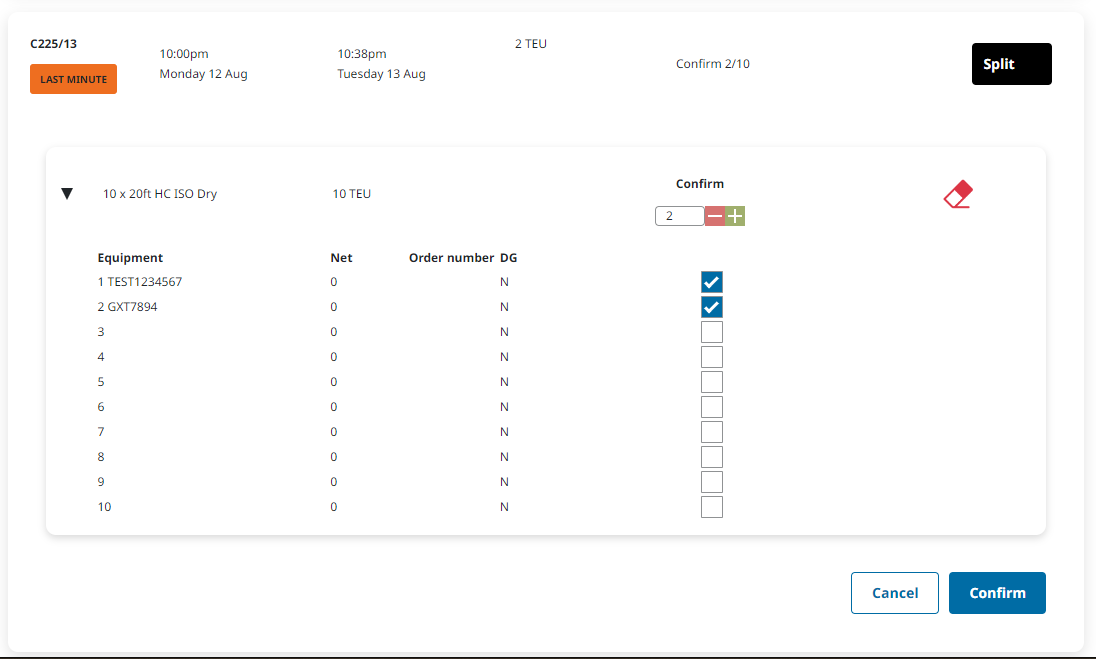
Any services you choose will be reserved for the next 30 minutes. If you don’t finish making your booking in 30 minutes the reservation will be released and other customers will be able to take the capacity.
If you want to book roading, read more here.
Once you’re happy with your chosen services, click Review & Book to go to the final page.
On the Review and Book page you will have a chance to double check all of the details before creating the booking.
Review & Book

If you want to make any changes you can click any of the “Click to Edit XXX” links to go back to that page, or you can click on the arrows at the top of the page to jump back to that section:

Once you’re happy with all of the details click Complete Booking to finalise your booking with KiwiRail.
Note that your booking isn’t complete unless you get a “Thank you! You have successfully created this booking” message like below:
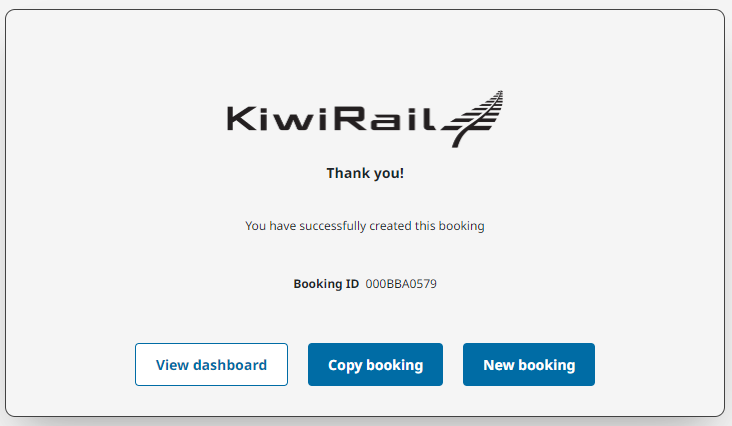
Once you’ve completed your booking you can make another booking, copy the booking you’ve just made, or return to the dashboard.